Can you Keep a Secret?


I was going to write that blog entry on using REST from powershell, as well as Alternate Data Streams on NTFS. And I still will, but to make the journey more coherent, I want to look at keeping secrets first.
I'm on my third iteration of a mechanism for keeping AD Credentials, API keys, client secrets and other forms of my-eyes-only data safe from prying eyes. My first version used Import/Export-Clixml to manage secrets in secure strings. (There was a v1.1 that use Alternate Data Streams to add extra metadata without requiring me to change the schema.) Version 2 was just a rewrite, with a better schema, that removed the dependency on ADS and NTFS.
In version 3, I retained the cleartext schema of version 2, but used Azure KeyVault as the secret repository, as my automations were now running on several servers, and the distribution of secrets was getting quite tricky.
As I write this, I'm 'resting', as an actor might say - between jobs. But I have my various powershell projects, and so I'm going to re-implement version 3 in my own Azure subscription, and use that implementation for future blog posts, not least so I don't have to keep xxxx-ing out my secrets from the code I post.
So this post will cover the Azure setup using powershell, the creation and upload of suitable self-signed certificates to enable access to the KeyVault, and the powershell code for saving and retrieving sets of secrets. I say sets of secrets, because my schema supports sets, and there are valid reasons for grouping secrets together - but not all of them, in case a set is compromised.
I did actually do a parallel run using the Azure portal, but it was very long-winded, because of the sheer number of screen captures needed. The powershell mechanism is delightfully concise, but there are some oddities. Nothing insuperable, but the oddities are there. From a scan of the REST docs, I think the same holes are present there also.
Let's start with a quick summary of the security model (see https://learn.microsoft.com/en-us/azure/active-directory/develop/app-objects-and-service-principals for the full description). Minus the 'why', if I want to automate a well-defined action, such as reading a secret from a KeyVault, Azure requires me to create an Application to do that on my behalf. Permission is then granted to the application to read the secret.
Put another way (this is the 'why'), I authenticate (prove who I am) to the application, and it is the application that is configured with authorisation (what I am allowed to do) to perform actions. If the scope of the application grows (or shrinks), the authorisation changes but the authentication does not change. If more (or fewer) users require to use the application, then the authentication is re-configured, but the authorisation is unchanged - I do not have to reconfigure every new user with new permissions.
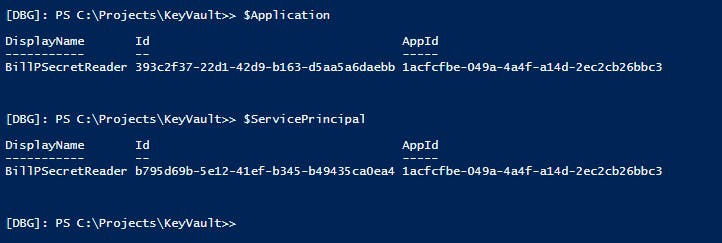
That's slightly complicated by the use of Service Principals derived from and representing the application in each tenant. The Service Principals and Application share a field called AppId, but they have object id fields (called Id) that are distinct from each other and from the AppId:
There has to be at least one Service Principal for the process to work (more if you're using the Application from multiple tenants) but beyond creating it/them and linking them to the Application, they're not referenced directly by the powershell.
Let's go...
Part 1: Azure Setup
These are all the 'static' pieces: the Key Vault itself, the application(s) and service principal(s), and the access policies on the Key Vault that define what each application is allowed to do.
#
# script to create a demo Key Vault in my Azure account
#

param ($TenantId           = 'aaaaaaaa-bbbb-cccc-dddd-eeeeeeeeeeee',
       $Region             = 'UK South',
       $ResourceGroupName  = 'PowershellBlog',
       $ApplicationNames   = @('BillPSecretReader','BillPSecretAdmin'),  # create 2 applications
       $KeyVaultName       = 'StrongBox'
      )

#
# rather than import the whole of the Az module, just bring in what we need. It's much faster
Import-Module Az.Accounts   -Verbose
Import-Module Az.Resources  -Verbose
Import-Module Az.KeyVault   -Verbose

$ConnInfo = Connect-AzAccount -TenantId $TenantId

#
# we need to create a resource group, an application and a key vault

try {
    $ResourceGroup = Get-AzResourceGroup -Name $ResourceGroupName
}
catch {
    #
    # doesn't exist, so create it
    $ResourceGroup = New-AzResourceGroup -Name $ResourceGroupName -Location $Region
}

#
# create new or fetch existing KeyVault
try {
    $KeyVault = Get-AzKeyVault -VaultName $KeyVaultName
}
catch {
    #
    # doesn't exist, so create it
    $KeyVault = New-AzKeyVault -VaultName $KeyVaultName
}

#
# now create access policies

$ApplicationNames | foreach {
    $ApplicationName = $_
    #
    # create new or fetch existing application
    $Application = Get-AzADApplication -DisplayName $ApplicationName
    if ($null -eq $Application) {
        #
        # doesn't exist, so create it
        $Application = New-AzADApplication -DisplayName $ApplicationName
    }

    #
    # create new or fetch existing service principal
    $ServicePrincipal = Get-AzADServicePrincipal -DisplayName $ApplicationName
    if ($null -eq $ServicePrincipal) {
        #
        # doesn't exist, so create it
        $ServicePrincipal = New-AzADServicePrincipal -ApplicationId $Application.AppId
    }

    #
    # for debugging only, check whether the Key Vault has an access policy for the application
    $accessPolicy = $KeyVault.AccessPolicies | where {$_.ObjectId -eq $Application.Id}
    if ($ApplicationName -like "*Reader") {
        #
        # set a policy
        Set-AzKeyVaultAccessPolicy -VaultName $KeyVaultName `
                                   -ServicePrincipalName $ServicePrincipal.ServicePrincipalName[0] `
                                   -PermissionsToSecrets Get,List
    }
    elseif ($ApplicationName -like "*Admin") {
        Set-AzKeyVaultAccessPolicy -VaultName $KeyVaultName `
                                   -ServicePrincipalName $ServicePrincipal.ServicePrincipalName[0] `
                                   -PermissionsToSecrets Get,List,Set,Delete,Recover,Backup,Restore
    }

}

Write-Host "Done"
As a matter of good practice, all configuration and (most of) the magic strings are defined in parameters. The only exception to that is that I've decided to use the application name suffix to control whether the application can administer secrets or only read secrets.
The script has been written to be idempotent, so you can run it from the top and it'll check what is already present, and create what's missing. If there's a problem with what you've built, you can delete the Azure objects that weren't created right and try something different. When you're done developing, you should be able to delete everything, re-run the script, and it'll all be created new. Then you test it again, to see if you forgot a step. (You did? Run Get-History to see what you forgot.)
That $ConnInfo variable is quite interesting, by the way. If you dig down deep into it (try running $ConnInfo | ConvertTo-Json -Depth 6 from the powershell prompt), you'll find lots of useful information about your tenant in the Context area. For example, if you're not sure what scopes are available when using REST, there's a full list of them in there - which you can also use to avoid hard-coding scopes in your scripts.
For now, I've used the Azure Portal to create the actual secret:
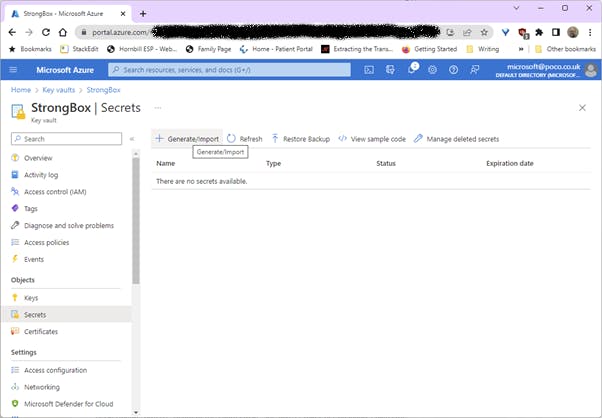
Choose Generate/Import. I created a secret called TestSecret and put some random text in it. I'll come back to secret get/set later.
Part 2: Creating a Self-Signed Certificate
Now we turn our attention to the workstation machine where the powershell automations will be running. The certificate will be created in the Cert:\CurrentUser\My folder (as it is known in powershell). The script was developed with the possibility that certificates might be installed at Cert:\LocalMachine\My so checks for administrative privileges.
#
# script to create certificate for Azure KeyVault
#

param ($AppName='BillPSecretReader')

#
# warn the user if they don't have sufficient privilege (and bail out)
# See https://ucpowershell.wordpress.com/2013/09/02/57/
#
$myIdentity = [System.Security.Principal.WindowsIdentity]::GetCurrent()
$wp = New-Object Security.Principal.WindowsPrincipal($myIdentity)
if (-not $wp.IsInRole([Security.Principal.WindowsBuiltinRole]::Administrator)) {
    Write-Host "This script requires administrative privileges, please re-launch with elevated credentials"
    exit 0
}

[Net.ServicePointManager]::SecurityProtocol = [Net.SecurityProtocolType]::Tls12

#region Setup
#
# standard functions to find the directory in which the script is executing
#
function Get-ScriptDirectory {
    $Invocation = (Get-Variable MyInvocation -Scope 1).Value
    Split-Path $Invocation.MyCommand.Path
}

function Get-ScriptPath {
    $Invocation = (Get-Variable MyInvocation -Scope 1).Value
    $Invocation.MyCommand.Path
}

$sdir = Get-ScriptDirectory
$spath = Get-ScriptPath

$infoColours = @{foreground="white"}
$notifyColours = @{foreground="cyan"}
$warningColours = @{foreground="yellow"}
$errorColours = @{foreground="red"}
$fatalColours = @{foreground="magenta"}
$debugColours = @{foreground="green"}

#endregion

$CertFriendlyName = "KVReader_$($env:USERNAME)_$($env:COMPUTERNAME)"
Write-Host -ForegroundColor Green "Certificate Friendly Name = '$CertFriendlyName'"

$TestCertCerPath = "$sdir\$($env:USERNAME)_$($env:COMPUTERNAME)_AutoCert.cer"

$Certs = Get-ChildItem Cert:\CurrentUser\My -Recurse | where {$_.FriendlyName -eq $CertFriendlyName}

if ($Certs -eq $null) {
    #
    # Create the certificate
    #
    $currentDate = Get-Date
    $endDate = $currentDate.AddYears(5)
    $notAfter = $endDate.AddYears(5)
    #
    # recommendations as per: https://learn.microsoft.com/en-us/azure/active-directory/develop/howto-create-self-signed-certificate
    $OSInfo = Get-CimInstance Win32_OperatingSystem
    switch ($OSInfo.Caption) {
        'Microsoft Windows Server 2012 R2 Standard' {
                Write-Host @errorColours "On Windows 2012 you must use MakeCert.exe to create a suitable certificate - download the Windows SDK from https://developer.microsoft.com/en-us/windows/downloads/windows-sdk/"
                exit 0
            }
        default {
                $cert = New-SelfSignedCertificate -CertStoreLocation Cert:\CurrentUser\My `
                                                  -DnsName poco.co.uk `
                                                  -KeyExportPolicy Exportable `
                                                  -KeySpec Signature `
                                                  -KeyLength 2048 `
                                                  -KeyAlgorithm RSA `
                                                  -HashAlgorithm SHA256 `
                                                  -Provider "Microsoft Enhanced RSA and AES Cryptographic Provider" `
                                                  -NotAfter $notAfter `
                                                  -Subject $CertFriendlyName `
                                                  -FriendlyName $CertFriendlyName
            }
    }

    if (-not (Test-Path -LiteralPath $TestCertCerPath)) {
        $thumb = $cert.Thumbprint
        Export-Certificate -cert "Cert:\CurrentUser\My\$thumb" -FilePath $TestCertCerPath
    }

    #
    # now upload the cer file to the App Certificates & Secrets area for the app
    $Message = @"
Now upload the '$TestCertCerPath' file to the App Certificates & Secrets area for app '$AppName'."
Use the description '$CertFriendlyName'
"@

    Write-Host -ForegroundColor Yellow $Message
    $message | Set-Content -Encoding UTF8 -LiteralPath "$sdir\$CertFriendlyName.FriendlyName"
}
else {
    #
    # multiple certs with the same friendly name - tidy up the excess certificates
    $uploadedCert = New-Object System.Security.Cryptography.X509Certificates.X509Certificate2
    $uploadedCert.Import($TestCertCerPath)
    $UploadedThumbprint = $uploadedCert.Thumbprint
    $Certs | foreach {
        $Cert = $_
        if ($Cert.Thumbprint -ne $UploadedThumbprint) {
            Remove-Item $Cert -Force
            $Cert.Thumbprint >> "$sdir\RemovedThumbprints.txt"
        }
    }
}
I developed this script to run on older operating systems - which required generating the certificate using makecert. I've removed that code, for simplicity.
Initially I used the FriendlyName to identify the certificate, but the powershell commands to upload the certificate do not preserve the FriendlyName - one of the oddities mentioned earlier. As a fallback, I therefore set the certificate Subject to the FriendlyName and this survives the upload, appearing (slightly modified, preceded by CN=) as the Description in the Azure Portal.
I've chosen a naming scheme that identifies the user and the machine as part of the FriendlyName / Subject, so that it is easy to update/maintain. Note that the powershell commands to list the certificates do not return the Thumbprint - another of the oddities mentioned above.
The code following the certificate creation was designed for scenarios where the certificate was generated from a service account in a scheduled job/task, to simplify the task of subsequently uploading it manually - this code can be ignored. The following code that removes certificates with duplicate friendly names dates from the early versions of the code which created many duplicates with different parameters.
Part 3: Uploading the Certificate
In this section I've chosen to upload the same certificate to both applications. If it is not required to update secrets from a particular machine, then the certificate should only be uploaded to the 'Reader' application.
#
# script to upload a certificate to an Azure Application
#

param ($TenantId           = 'aaaaaaaa-bbbb-cccc-dddd-eeeeeeeeeeee',
       $ApplicationNames   = @('BillPSecretReader','BillPSecretAdmin')
      )

$CertFriendlyName = "KVReader_$($env:USERNAME)_$($env:COMPUTERNAME)"

Import-Module Az

$ConnInfo = Connect-AzAccount -TenantId $TenantId

$ApplicationNames | foreach {
    $ApplicationName = $_
    #
    # fetch existing application
    $Application = Get-AzADApplication -DisplayName $ApplicationName

    #
    # note that the create script ensures no duplicate friendly names
    $cert = Get-ChildItem Cert:\CurrentUser\My -Recurse | where {$_.FriendlyName -eq $CertFriendlyName}
    $key = [System.Convert]::ToBase64String($cert.GetRawCertData())
    $newAppCred = New-AzADAppCredential -ApplicationObject $Application -CertValue $key
}
We are ready to test...
Part 4: Read the Secret
Still on the workstation - it's time to retrieve that secret. The code is slightly odd, as I'm planning to use Azure REST APIs to retrieve the secret, though I use the Az modules for everything else.
The intention here is to use this code as the basis for a future module. Yes, I could still use the Az modules within a module, but I've found that module lifecycles can be quite short, compared to the longevity of APIs, so reducing the dependence of my own modules on 3rd party modules is a Good Thing.
So:
#
# script to test the KB module can get a secret
#

param ($TenantId           = 'aaaaaaaa-bbbb-cccc-dddd-eeeeeeeeeeee',
       $KeyVaultName       = 'StrongBox'
      )

Import-Module MSAL.PS

Import-Module Az.Accounts   -Verbose
Import-Module Az.Resources  -Verbose
Import-Module Az.KeyVault   -Verbose

$ConnInfo = Connect-AzAccount -TenantId $TenantId

$Application = Get-AzADApplication -DisplayName 'BillPSecretReader'

$ServicePrincipal = Get-AzADServicePrincipal -DisplayName 'BillPSecretReader'

$CertFriendlyName = "KVReader_$($env:USERNAME)_$($env:COMPUTERNAME)"

$ClientCertificate = Get-ChildItem Cert:\CurrentUser\My | where {$_.FriendlyName -eq $CertFriendlyName}

$KVScope = $ConnInfo.Context.Environment.AzureKeyVaultServiceEndpointResourceId + '/.default'

$MsalSplat = @{
    TenantId          = $ConnInfo.Context.Account.Tenants[0]
    ClientId          = $Application.AppId
    ClientCertificate = $ClientCertificate
    Scopes            = @($KVScope)
}

$MsalToken = Get-MsalToken @MsalSplat

$MsalToken   # display it for reassurance

$KeyVault = Get-AzKeyVault -VaultName $KeyVaultName

$script:VaultURI = $KeyVault.VaultUri

function Get-KVSecretSet {
    [CmdletBinding()]
#    [OutputType([string])]
    param (
        [parameter (mandatory=$false)] [string] $SecretName='PSAutomation',
        [parameter (mandatory=$true)]  $Token
    )

    if ($Token.GetType().Name -eq 'AuthenticationResult') {
        #
        # MSAL token
        $AccessToken = $Token.AccessToken
    }
    else {
        #
        # client secret-derived token from KeyVault REST API
        $AccessToken = $Token.access_token
    }
    $headers = @{}
    $headers["Content-Type"] = 'application/json'
    $headers["Authorization"] = "Bearer $($AccessToken)"
    $headers["Accept"] = 'application/json; version=4'

    $Url = $script:VaultURI + "secrets/$SecretName"
    $Url = $Url + "?api-version=7.3"

    # Splat the parameters for Invoke-RestMethod for cleaner code
    $GetSplat = @{
        ContentType = 'application/json'
        Method = 'GET'
        Uri = $Url
        Headers = $headers
    }

    # Request the secret!
    $Response = Invoke-RestMethod @GetSplat
    $Response
}

$Secret = Get-KVSecretSet -SecretName TestSecret -Token $MsalToken

Write-Host "Secret value is '$($Secret.value)'"
That concludes the process. Most of it is one-time setup, creating the Key Vault itself, and creating/applying a certificate to establish trust between the Key Vault and active directory accounts on specific machines.
Back soon with another post. Bye for now.